In a previous post we have looked at how we can turn a mono audio signal into a stereo signal with an applied pan. One drawback of this program was that it was not possible to change the pan throughout the track, meaning that once a pan had been selected it would be applied to the entire song.
Now that we have implemented breakpoints, we can start looking at changing the pan (and other properties) throughout the duration of the track.
In this post we will take a mono audio signal and change the pan from left, to right, to left again. To verify our code works as expected it’s best to use a clean signal, so for this we will once again use a mono sine.wav, with a duration of 10 seconds.
The breakpoint file
Remember that our breakpoint file-format has entries that are pairs of time:value. Let’s make a
breakpoint file that pans from left to right, to left again, and so on until the end of the track.
We’ll call this pan.brk.
0:-1
2:1
4:-1
6:1
8:-1
10:1
Because the values are interpolated, we get a gradual shift from left -> right, and right -> left over the course of the track.
The Code
All the code for this blog can be found on Github.
Luckily a lot of the code for implementing this program has already been written by us, mostly in
Part 4 and Part
5. The only novel part here is how we
can correctly call our ValueAt function.
First, we’ll need to add a flag pointing to the breakpoint file, so our flags become:
|
|
Next we need to create a function that applies a pan with breakpoints. The first steps here are to
read the content from our breakpoint file, and turn them into actual Breakpoint structs. In the
last post we have created the ParseBreakpoints function for this.
In the same file from Part 4, we can
add the start of this function. (For brevity, I’m leaving out the error handling thus the _ are
unchecked.
|
|
Now our setup is done, we have our breakpoints and our .wav frames in memory, we need to actually
manipulate them. Our ValueAt function to figure out the correct pan at each frame takes three
inputs. ([]Breakpoint, frameTime, offset). We can ignore offset for now, so only the first two
are important. Our []Breakpoint can just be passed from pnts, so then we are left with figuring
out how to send the correct frameTime.
Well, to find out how much time there is between frames, we can look at the SampleRate that was
extracted when reading the .wav input file. Thus our time increment becomese 1 / wave.SampleRate.
When we have our time increment, all that is left is to just iterate over the frames and call
ValueAt with the correct timestamp. Adding this to our function it becomes:
|
|
We can now test this by running:
go run main.go -i mono.wav -o stereo.wav -b pan.brk
Which gives us the following result: pan.wav
Examining the created sound.
If you listened to the panned file, you might have noticed that the sound seems a bit off. As it turns out, the pan function that we have implemented was overly simplistic and caused the volume to be quite different near the center (balanced left/right) than when it was panned entirely left/right.
The way to fix this is by implementing a “Constant Power Panning” function. Such a function makes sure that the overall volume is similar, no matter how the signal is panned.
We can see this by examining the power of the signal given the different amplitudes in each channel.
The function for this is: sqrt(ampleft*ampleft + ampright*ampright). Hence for our simple pan in the centre this
would become: sqrt(0.5*0.5 + 0.5*0.5) = 0.707 The power here does not equal 1, yet when we examine
the same function at the left channel we notice that this is a loss of about ~3dB:
sqrt(1*1 + 0*0) = 1
Thus the power at the left / right is greater than at the centre. This is fundamentally what we aim to fix to get a constant power pan.
Constant Power Panning
I’ll avoid going deep into the technical details, but this page by Carnegie Mellon University explains it better than I could.
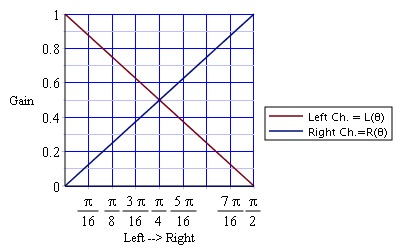
Our current ‘simple panning’ function is a Linear Pan, and when we look at the the volumes in each channel we get this (also taken from CMU)

With a constant power pan however, the volumes in each channel would look like this:
You’ll notice that whilst the centre is still lower than either side, it is less pronounced and the dropoff happens less quickly.
The functions we can use to obtain this result for left and right channel are:
- left:
sqrt(2)/2 * [cos(angle) + sin(angle)] - right:
sqrt(2)/2 * [cos(angle) - sing(angle)]
Implementing this in code is rather straightforward, although we do have to keep in mind that the trig functions work with radians and thus have to scale our input such that each channel maps to 1/4 of a cycle.
|
|
When we replace our simplePan function with this one, we get the following output:
When we open these files in audacity, we can clearly see the difference in the rise and fall of the amplitudes in each channel.
Next we’ll take a look at how we can extract breakpoints from existing soundfiles (as long as they are in .WAV file format), and we’ll also discuss the performance of the breakpoint function we are using.
Resources
If you liked this and want to know when I write new posts, the best way to keep up to date is by following me on twitter.